
One of my friends recently installed a new storage server in our shared lab environment and graciously gave me some storage space on it via iSCSI. I use Proxmox for my personal lab, and I intended to store some non-critical VM disks on this new storage so I could play around with properly using HA (High Availability) with Proxmox. Additionally, I wanted to gain some experience using iSCSI at the same time. While I trust my friend, the storage itself is outside of my control, so I figured it would be good practice to encrypt my data. The general go-to solution for this would seem to be LUKS. Read More
A Stratum 1 Time Server – The Basics
A while ago, I decided to play around with trying to create something cheap that would be able to synchronise its time by using GPS instead of over the internet – essentially building my own Stratum 1 time server. I intend this to be a series of articles about NTP and time servers, but let’s start with the basics…
What is a Stratum 1 Time Server?
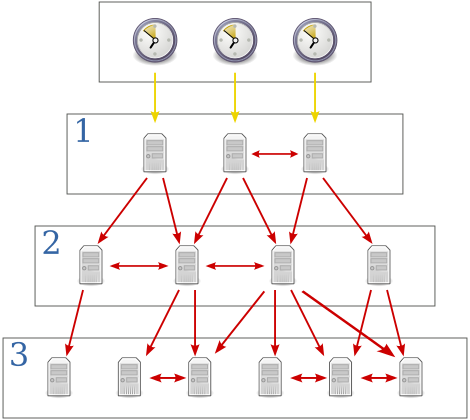 The lower the “Stratum” number the more accurate the time it should be able to tell. Usually Stratum 1 time servers are directly connected to an accurate source of time such as (but not limited to) Atomic, GPS or even Radio clocks. The stratum of the machine which itself is directly interfacing with the accurate time source would be “Stratum 0”. For each additional layer of NTP servers added, the stratum increases by 1.
So if the server that’s connected directly to the time source is stratum 0, it would appear to any clients who want to synchronise with it as a stratum 1 source. If someone then tries to synchronise to one of those, they would see a stratum 2 source and so on. The image on the right illustrates the top-down increase in stratum and was taken from Wikipedia.
Generally the higher the stratum number, the less-accurate its view of time is. A stratum ranges from stratum 1 all the way to stratum 15 indicating the time is getting further away from a reference clock the higher you go. Stratum 16 indicates the clock is pretty far from the reference and should be considered un-synchronised and should not be used.
Dual-stacking Proxmox Web UI (pveproxy)
![]() As part of my recent (and ongoing) project to implement native IPv6 on my own infrastructure (except at home… I’m looking at you Hyperoptic), I decided to try to dual-stack as much as possible so that when I have IPv6 connectivity, services would prefer that over IPv4, without making things unavailable.
As part of my recent (and ongoing) project to implement native IPv6 on my own infrastructure (except at home… I’m looking at you Hyperoptic), I decided to try to dual-stack as much as possible so that when I have IPv6 connectivity, services would prefer that over IPv4, without making things unavailable.
As it turns out, Proxmox’s Web interface (pveproxy) doesn’t listen on the IPv6 address family by default. This stumped me for a little while, but its pretty simple to fix when you know whats going on.
This post is going to spend most of its time explaining why this happens rather than the fix. If you’re just here to see how to do it, check below.
Shoehorning Proxmox into mdadm RAID1
My home server has always been somewhat of a Frankenstein’s Monster when it comes to hardware. Until about 2 years ago, it consisted of a large JBOD array of several different drive sizes with no kind of redundancy what-so-ever – for both OS and Data disks. That all changed though when I decided to invest in some 3TB disks and build a “proper” RAID array for my data; Which coincidentally was around the same time my data storage array lost a drive resulting in about 800GB of data-loss – I was unable to source a decent hardware RAID card at the time so I went with Software RAID (mdadm) instead.
The chassis which houses my home server happens to be an old X-Case model that has 10 internal bays, a couple of 5.25″ for Optical drives and a 5.25″ to 3.5″ caddy that seems to be designed for a floppy drive (it has a cut-out at the front for access). I use the floppy slot to house my OS disk and the rest are for my data disks which are all in RAID6 for redundancy. This gives me a total of 11 hard drives in this chassis in its default configuration.
When I rebuilt my server to make use of Proxmox, I put in a known-working drive as the OS drive; It was an old drive at the time but didn’t have much in the way of power on hours so I figured it’d last me a while. Here I am a few years later and the drive is still going, but SMART data is showing some figures that’re making me worried it’s going to start having problems soon so I set about replacing it.
Routed Subnets, rp_filter and arp_ignore
Over the past couple of years, I’ve been quite accustomed to my ISP providing me with an IP block (typically a /29) instead of just a single static IP, but recently I’ve switched to Hyperoptic for their FTTP offering (Because, Gigabit!). Unfortunately, they seem to only offer single IPs for residential service and require you to be on their business package which costs £££ if you want more IPs.
To get around this I decided to try to tunnel some IPs home – My setup is rather complex but I’m going to skip over the specifics for most of it and focus on the issue I was facing – lets ignore how the IPs route around the rest of my network and ultimately end up at the router for now and just look at the rather simplified view below.
Odd behaviour with /etc/mtab being a regular file
One of our customers had recently requested a Bare-Metal Restore (BMR) of one of their servers; which is a pretty routine task for us. However, upon bringing the restored server up I’d noticed some odd behaviour with some of its services, notably snmpd.
Our monitoring successfully polls most metrics that we look for, however fails on getting disk statistics and eventually snmpd just starts timing out. Using snmpbulkwalk I could see that I was getting a response right up until midway through the HOST-RESOURCES MIB. It did look to be hanging on mount points and once snmpbulkwalk had timed out, I couldn’t get a successful response from snmpd again. This was also seemingly affecting MariaDB, preventing it from starting, amongst other things. Read More
Growing my Linux RAID5 array
Recently I’ve needed to expand my RAID5 array by adding another disk. My experience with mdadm since starting to use it back in 2009 was for RAID1 only so I’ve never really needed to actually expand an array and so I thought I’d document the process here for future reference.
This process should in theory work for RAID4 and RAID6 personailities too, not just RAID5.
My array consists of 4x 3TB WD Red NAS drives in RAID5 for a total of ~9TB of space. I’m not going to cover creating of the array here because its mostly the same as RAID1, this instead will cover how to add a new disk to it and subsequent growing of LVM and ext4 to make use of the extra space. You can see how everything is stacked together in the image below. Read More
Slow DNS resolving using bind9 as caching resolver
I currently have 4 DNS servers across my estate and until recently these were all configured to forward all queries to Google DNS (8.8.8.8). I ended up having an issue with Google caching an undesired record value so I opted to change my DNS servers so that they no longer forward queries elsewhere, but instead try to answer it themselves; Doing this gives me slightly more control over my DNS cache.
As I use named (bind9) this was a pretty trivial change – Simply remove the forwarders { 8.8.8.8; }; clause in my configuration and that should be that.
During my post-change testing though I’d noticed that resolution was taking significantly longer for un-cached queries than I’d expect (microsoft.gointeract.io is only used to illustrate my issue): Read More
Caching with Apache’s mod_cache and mod_deflate
I currently work in the hosting industry and as part of my job I have to deal with WordPress on a regular basis and as such I’ve seen how appalling it can be sometimes with regards to page loading times. Given that my content on here doesn’t change all too often, it makes sense to spend the time generating the content only once and serving it to meet multiple requests for the same document. In order to do this one would usually employ some form of caching.
WordPress itself does have the option for multiple caching plugins which integrate nicely but in my experience they still have to pass the request off to a PHP handler which means some processing is still needed to accommodate the request (albeit less than a full page load). For the purposes of this article though, I’m going to assume a generic framework as this technique is not specific to WordPress at all.
There’re a number of software solutions to sit in front of your web server which act as a cache and some of the more notable ones are nginx and varnish and each have their pros and cons (As far as I know, Varnish can’t do native SSL termination yet). For this post though, I’ll be making use of some Apache modules to do the same thing. This was mostly an experiment for myself to see what I could do with it – I’ve found some limitations which as of yet I haven’t been able to work around for lack of knowledge on the inner workings of Apache, but for now It does the job. Read More
Full screen Flash Video on Linux
 So here we have it – I’ve finally got around to tackling this issue which has been bugging me for a while.
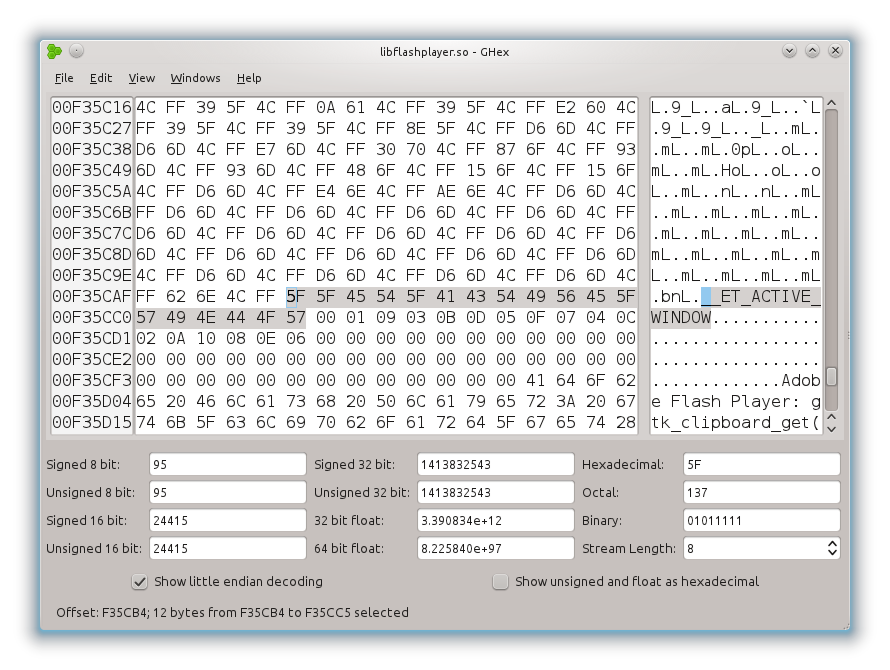
When watching a flash video in full screen on dual monitors, as soon as you go off to do something else you will soon notice that your video is no longer full screen! How annoying.
The way to fix this is to edit the flash player binary. Firstly you need a hex editor – I use “ghex”
$ sudo apt-get install ghex
You can of course use your hex editor of choice. Read More