
Growing my Linux RAID5 array
Recently I’ve needed to expand my RAID5 array by adding another disk. My experience with mdadm since starting to use it back in 2009 was for RAID1 only so I’ve never really needed to actually expand an array and so I thought I’d document the process here for future reference.
This process should in theory work for RAID4 and RAID6 personailities too, not just RAID5.
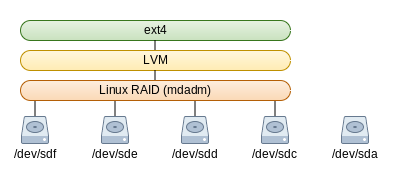
My array consists of 4x 3TB WD Red NAS drives in RAID5 for a total of ~9TB of space. I’m not going to cover creating of the array here because its mostly the same as RAID1, this instead will cover how to add a new disk to it and subsequent growing of LVM and ext4 to make use of the extra space. You can see how everything is stacked together in the image below.
There are a number of steps involved in expanding my array and I’ll be going through each one but loosely speaking they are:
 Create a partition on the new drive to be inserted
- Add the new drive to my array
- Grow the array
- Add the free space to LVM
- Grow the logical volume
- Resize ext4 to make use of the new space
I will admit, I had to do a little bit of brushing up on my mdadm and partitioning skills and I’d found these two sites useful:
https://raid.wiki.kernel.org/index.php/Growing
http://www.cyberciti.biz/tips/fdisk-unable-to-create-partition-greater-2tb.html
For the purposes of this article though, I’ve already installed the new disk into the chassis and made sure that my system can see the new drive before doing any further work; Lets take a look at my array before doing anything to it – You can see here I have about 9TB of space
root@yuzuki:~# df -h /dev/mapper/data-wdred
Filesystem              Size  Used Avail Use% Mounted on
/dev/mapper/data-wdred  8.2T  7.5T  678G  92% /mnt/storage
So lets begin…
Partition the new drive using parted
I’d normally use fdisk for this because its what I am most familiar with, however it seems that you can’t create a partition greater than 2TB in size using it so I’ve had to use parted for this. The disk is a blank disk so your output may vary from the below if you’re working with something that is already partitioned, but first we create a GPT partition and set it to be 3TB in size (as we want to use the whole disk), we then check what parted thinks exists on the disk just to make sure everything is correct and thats the disk partitioned
root@yuzuki:~# parted /dev/sda
GNU Parted 3.2
Using /dev/sda
Welcome to GNU Parted! Type 'help' to view a list of commands.
(parted) mklabel gpt
Warning: The existing disk label on /dev/sda will be destroyed and all data on this disk will be lost. Do you want to continue?
Yes/No? Yes
(parted) unit TB
(parted) mkpart primary 0 3
(parted) toggle 1 raid
(parted) print
Model: ATA WDC WD30EFRX-68E (scsi)
Disk /dev/sda: 3.00TB
Sector size (logical/physical): 512B/4096B
Partition Table: gpt
Disk Flags:

Number  Start   End     Size    File system  Name     Flags
 1      0.00TB  3.00TB  3.00TB               primary  raid

(parted) quit
Information: You may need to update /etc/fstab.
I set the “type” flag on the partition to be Linux RAID – Again this was out of habbit and I’m not really sure if it affects auto scanning of the array these days.
That should be everything for partitioning done – You should now see in your devices /dev/sda and /dev/sda1
Grow the array using Linux RAID (mdadm)
Now that we’ve partitioned the new disk to be used, we need to add it to our raid5 array. This part is simple enough and once I’d added it, I detailed the array and you can see the new disk as a spare near the bottom
root@yuzuki:~# mdadm --add /dev/md0 /dev/sda1
mdadm: added /dev/sda1

root@yuzuki:~# mdadm --detail /dev/md0
/dev/md0:
        Version : 1.2
  Creation Time : Wed Sep  9 00:42:04 2015
     Raid Level : raid5
     Array Size : 8790402048 (8383.18 GiB 9001.37 GB)
  Used Dev Size : 2930134016 (2794.39 GiB 3000.46 GB)
   Raid Devices : 4
  Total Devices : 5
    Persistence : Superblock is persistent

    Update Time : Sun Jul  3 13:42:19 2016
          State : clean
 Active Devices : 4
Working Devices : 5
 Failed Devices : 0
  Spare Devices : 1

         Layout : left-symmetric
     Chunk Size : 512K

           Name : yuzuki:0  (local to host yuzuki)
           UUID : 85414a00:04a22cb3:8cd5656f:8e86f737
         Events : 57988

    Number   Major   Minor   RaidDevice State
       0       8       81        0      active sync   /dev/sdf1
       1       8       33        1      active sync   /dev/sdc1
       2       8       65        2      active sync   /dev/sde1
       4       8       49        3      active sync   /dev/sdd1

       5       8        1        -      spare   /dev/sda1
Great! If we left this as-is now then this new disk would simply be automatically used to rebuild the array if one of the current active disks fail, essentially RAID5 with a hot-spare. I however want to incorporate this disk into my array to be able to grow capacity.
I read that at the start of the growing process there’s a critical section where if power is interrupted this data can become lost which would kill the entire array so It’s recommended to back this up onto a different disk/array for recovery purposes. Thankfully I didn’t need to use this
Growing is also fairly straightforward in that you tell the array how many active drives you want (in my case 5) and which array to change and everything else is done in the background.
root@yuzuki:~# mdadm --grow --raid-devices=5 --backup-file=/home/simon/grow.bak /dev/md0
mdadm: Need to backup 6144K of critical section..
Actually growing the array is the most time consuming part of this process; Overall this next task took 21 hours to complete on my rig.
root@yuzuki:~# cat /proc/mdstat
Personalities : [raid6] [raid5] [raid4]
md0 : active raid5 sda1[5] sdf1[0] sdd1[4] sde1[2] sdc1[1]
      8790402048 blocks super 1.2 level 5, 512k chunk, algorithm 2 [5/5] [UUUUU]
      [>....................]  reshape =  0.0% (402624/2930134016) finish=1333.9min speed=36602K/sec

unused devices: <none>

root@yuzuki:~# mdadm --detail /dev/md0
/dev/md0:
        Version : 1.2
  Creation Time : Wed Sep  9 00:42:04 2015
     Raid Level : raid5
     Array Size : 8790402048 (8383.18 GiB 9001.37 GB)
  Used Dev Size : 2930134016 (2794.39 GiB 3000.46 GB)
   Raid Devices : 5
  Total Devices : 5
    Persistence : Superblock is persistent

    Update Time : Sun Jul  3 13:46:39 2016
          State : active, reshaping
 Active Devices : 5
Working Devices : 5
 Failed Devices : 0
  Spare Devices : 0

         Layout : left-symmetric
     Chunk Size : 512K

 Reshape Status : 0% complete
  Delta Devices : 1, (4->5)

           Name : yuzuki:0  (local to host yuzuki)
           UUID : 85414a00:04a22cb3:8cd5656f:8e86f737
         Events : 58026

    Number   Major   Minor   RaidDevice State
       0       8       81        0      active sync   /dev/sdf1
       1       8       33        1      active sync   /dev/sdc1
       2       8       65        2      active sync   /dev/sde1
       4       8       49        3      active sync   /dev/sdd1
       5       8        1        4      active sync   /dev/sda1
As you can see here, the reshape has started and is giving me an estimate of ~22 hours – The estimate and speed will vary throughout the process and you can control the speed at which it works (if you need to lower it to reduce disk IO for some reason) via /proc/sys/dev/raid/speed_limit_min and /proc/sys/dev/raid/speed_limit_max. You can also see here that I no longer have a “spare” disk too; This means I’ll have 4 drives worth of capacity with 1 used for parity data, so when complete, I should have 12TB worth of storage.
Once the reshape has completed we can move onto the next stage.
Growing LVM
Now that our array itself has grown, we need to make LVM aware of the free space before we can use it and we do this simply by issuing a pvresize command on the block device mdadm uses for exposing our array, after which we can see that 2.7TiB is registered as free for both the Physical Volume and in the Volume Group too.
root@yuzuki:~# pvresize /dev/md0
  Physical volume "/dev/md0" changed
  1 physical volume(s) resized / 0 physical volume(s) not resized

root@yuzuki:~# pvscan
  PV /dev/sdb3   VG pve    lvm2 [148.55 GiB / 16.00 GiB free]
  PV /dev/md0    VG data   lvm2 [10.92 TiB / 2.73 TiB free]
  Total: 2 [11.06 TiB] / in use: 2 [11.06 TiB] / in no VG: 0 [0   ]

root@yuzuki:~# vgdisplay data
  --- Volume group ---
  VG Name               data
  System ID
  Format                lvm2
  Metadata Areas        1
  Metadata Sequence No  3
  VG Access             read/write
  VG Status             resizable
  MAX LV                0
  Cur LV                1
  Open LV               1
  Max PV                0
  Cur PV                1
  Act PV                1
  VG Size               10.92 TiB
  PE Size               4.00 MiB
  Total PE              2861458
  Alloc PE / Size       2146093 / 8.19 TiB
  Free  PE / Size       715365 / 2.73 TiB
  VG UUID               XT2yMd-iyVD-4u0e-5AG8-7GED-kcfd-ebLjNL
All thats left now is to expand the Logical Volume which I want to use all available free space in the Volume Group:
root@yuzuki:~# lvextend -l +100%FREE /dev/mapper/data-wdred /dev/md0
  Size of logical volume data/wdred changed from 8.19 TiB (2146093 extents) to 10.92 TiB (2861458 extents).
  Logical volume wdred successfully resized
Now we’re in the home stretch!
Expanding ext4 file system
 The final leg of this task is to expand the file system that sits on top of all this.
I opted to do this online which means it ran without a consistency check – If you wanted to check it first you’d need to un-mount the file system in order to run e2fsck. I originally expected this to take a fairly long time but it turns out it took less than a minute to complete.
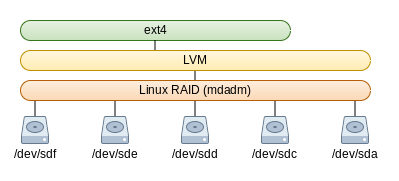
The image to the right illustrates where we’re at in the process – we’ve added the new disk to our RAID array and expanded LVM to fit, this last step will be to grow our ext4 file system to boot.
Naturally you don’t have to use ext4, this is just my preference however it is at this stage that your path could differ from mine if you’re not using ext4 (or ext3) but the process should be similar if your chosen file System supports growing.
root@yuzuki:~# time resize2fs -p /dev/mapper/data-wdred
resize2fs 1.42.12 (29-Aug-2014)
Filesystem at /dev/mapper/data-wdred is mounted on /mnt/storage; on-line resizing required
old_desc_blocks = 524, new_desc_blocks = 699
The filesystem on /dev/mapper/data-wdred is now 2930132992 (4k) blocks long.


real    0m35.221s
user    0m0.008s
sys     0m29.460s
And that’s it, My storage array has now grown! Overall the process took me about 22-23 hours because I kept getting distracted in-between but the majority of this time was waiting for mdadm to grow the array. We can compare output of df from before and after
Before
root@yuzuki:~# df -h /dev/mapper/data-wdred
Filesystem              Size  Used Avail Use% Mounted on
/dev/mapper/data-wdred  8.2T  7.5T  678G  92% /mnt/storage
After
root@yuzuki:~# df -h /dev/mapper/data-wdred
Filesystem              Size  Used Avail Use% Mounted on
/dev/mapper/data-wdred   11T  7.5T  3.4T  69% /mnt/storage
And I still have space for another 5 drives in my chassis 🙂
*HDD Icons provided by https://icons8.com*