
Ethereum Mining with NVIDIA on Linux
![]() Bitcoin has been getting a lot of attention in the media lately; primarily due to its association with recent high profile ransomware incidents. Bitcoin was first introduced back in 2009 as a digital currency and has been steadily gaining traction since, increasing almost 140% in value so far this year!
Bitcoin has been getting a lot of attention in the media lately; primarily due to its association with recent high profile ransomware incidents. Bitcoin was first introduced back in 2009 as a digital currency and has been steadily gaining traction since, increasing almost 140% in value so far this year!
Bitcoin however, is not the only player in the game; Ethereum is another popular digital currency, currently sitting at 2nd place in total market value and is getting a lot of activity on currency exchanges.
An incentive to help keep the underlying “network” up and running (for both Ethereum and Bitcoin, amongst others) is a piece of software which can be used to validate transactions on the network and issue rewards for doing so. This is otherwise known as Mining.
My current Gaming PC seems to grab me a reasonable amount of Ethereum Tokens on 2+ year old hardware. Certainly enough to make me want to play around with actually mining some.
TLDR
Skip right to the overclocking commands here. Otherwise, continue reading 🙂
Why use Linux?
The mining program I am using is currently a Fork of a Fork from the original C++ based version developed by the Ethereum Foundation. In its FAQ there seem to be known issues with NVIDIA, WDDM and Windows 10 which cause lower-than expected performance of NVIDIA cards when mining. A supposed fix is to use an older set of NVIDIA drivers along with a different build of the mining software specifically built for CUDA 6.5.
The machine I am using is my Gaming PC (which requires Windows), so I’m not prepared to jump through those hoops – running older drivers isn’t always conducive to a good gaming experience. My graphics card is NVIDIA and I’ve always had reasonable experiences using their Linux drivers so giving this a go on Linux seemed like a natural fit.
My hardware
I’ve not yet built myself a dedicated mining rig but these are the specs I’m working with:
- Gigabyte H67N-USB3-B3 Motherboard
- Intel Core i7-2600 CPU @ 3.40GHz
- 16GB RAM
- NVIDIA GeForce GTX 970 – GM204 (GV-N970IXOC-4GD)
- Current Driver Version: 375.66
Getting Started
In order to start mining Ethereum, you’ll first need a working Linux installation – My distro of choice is Ubuntu (16.04 LTS) Xenial.
When first installing and running Ubuntu I did have to make use of nomodeset in grub before anything would actually display on my screen – This seems to be card specific but it might help you get going! See here for more info about nomodeset.
Once you’re set up, you’ll need to install NVIDIA drivers. You can obtain Linux specific ones from NVIDIA directly and install those. As I’m using Ubuntu however, there should be some available in repos – apt-get install nvidia-375 at the time of writing this.
Establishing a baseline
Before we make any tweaks, we should establish what our baseline is on default settings. Keep in mind that this is specific to me and my hardware – your baseline may well be different depending on what equipment you use.
The version of ethminer I am using comes with a built in benchmark mode. To make these tests a fair comparison between tweaks, I’ve tested everything against block 3969748 (A random block I chose which represents the current difficulty of Ethash).
Running the benchmark for 10 trials, at 5 seconds each gives me an average hash rate of 18.31MH/s at the current difficulty. This is my baseline.
Enabling experimental features
By default, the NVIDIA drivers do not let you change any Experimental features (manual control of things) out of the box. In order to enable these, we need to add an option to our xorg.conf file. Before we make any changes here, you should back up your current config file if one exists. In my case this is /etc/X11/xorg.conf but your location may vary.
Once you know where your config file is, we need to add NVIDIA’s Coolbits option to the Devices section in the config. Using 28 in my case enables all experimental features – Even if we dont use them all 🙂
Section "Device"
    Identifier     "Device0"
    Driver         "nvidia"
    Option         "Coolbits" "28"
    VendorName     "NVIDIA Corporation"
EndSection
If you’re using multiple GPUs, you need to add the Option to each individual Device section in your config.
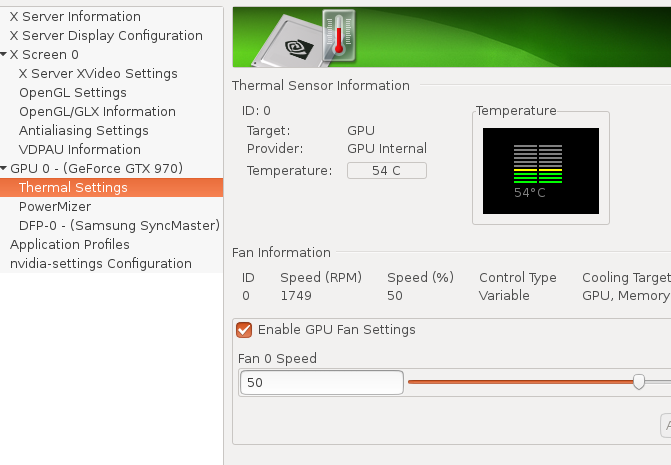
A simple way to see if it worked is to (after a reboot) open nvidia-settings and look at the Thermal Settings tab; You should see fan control options now available:
Persistence Mode
Before we do any actual tweaks, we should enable Persistence Mode to ensure our changes stay active even after we close any applications that might be using our card.
The nvidia-smi utility allows you to control multiple GPUs with its -i option.
nvidia-smi -i 0 -pm 1
nvidia-smi -i 1 -pm 1
nvidia-smi -i 2 -pm 1
etc
So enabling Persistence Mode on my machine would be:
simon@kirika:~$ sudo nvidia-smi -i 0 -pm 1
Enabled persistence mode for GPU 0000:01:00.0.
All done.
Power Limits
One of the tweaks we have access to is the ability to change power limits for our card. This is also controlled via nvidia-smi command line tool.
Lets look at what power limit options we have available:
simon@kirika:~$ nvidia-smi -i 0 -q -d power

==============NVSMI LOG==============

Timestamp                           : Mon Jul  3 18:11:28 2017
Driver Version                      : 375.66

Attached GPUs                       : 1
GPU 0000:01:00.0
    Power Readings
        Power Management            : Supported
        Power Draw                  : 12.90 W
        Power Limit                 : 160.00 W
        Default Power Limit         : 160.00 W
        Enforced Power Limit        : 160.00 W
        Min Power Limit             : 100.00 W
        Max Power Limit             : 180.00 W
    Power Samples
        Duration                    : 78.01 sec
        Number of Samples           : 119
        Max                         : 61.22 W
        Min                         : 12.71 W
        Avg                         : 14.83 W
On this initial query, I can see that the default power limit for my card is 160 watts and that the maximum I can set it to is 180 watts.
Lets set it to 180w
simon@kirika:~$ sudo nvidia-smi -i 0 -pl 180
Power limit for GPU 0000:01:00.0 was set to 180.00 W from 160.00 W.
All done.
More power should mean better performance, Right? – Nope.
Performance States
I performed a benchmark at each power level my card supports, with a 5w increment between them.
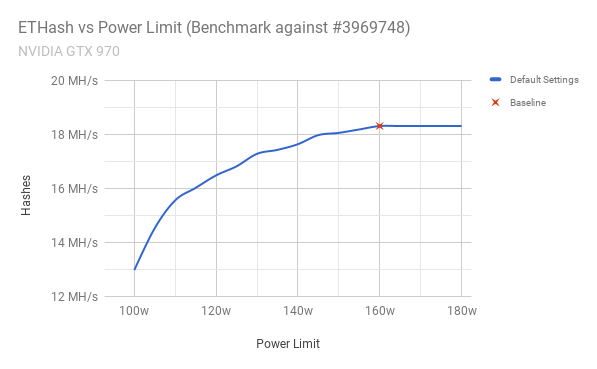 The graph above shows what I’d expect when we decrease our power limit below 160w; A steady decrease in hashes the lower the supplied power goes. At the top end of the scale though, I don’t actually gain any performance improvements what-so-ever.
After a bit of reading around on forums – This is because the mining application is providing a compute workload to the card, rather than something more graphical in nature. The default clock speeds for “Applications” appears lower than what the card is capable of and thus it gets capped into P2 Performance State; Hence the flatline on the graph.
To view what our current Application Clock is set to, we can take a look using nvidia-smi once again, and looking for Application Clocks and Default Application Clocks.
simon@kirika:~$ nvidia-smi -i 0 -q -d clock

==============NVSMI LOG==============

Timestamp                           : Wed Jul  5 00:00:38 2017
Driver Version                      : 375.66

Attached GPUs                       : 1
GPU 0000:01:00.0
    Clocks
        Graphics                    : 1240 MHz
        SM                          : 1240 MHz
        Memory                      : 3004 MHz
        Video                       : 1141 MHz
    Applications Clocks
        Graphics                    : 1076 MHz
        Memory                      : 3505 MHz
    Default Applications Clocks
        Graphics                    : 1076 MHz
        Memory                      : 3505 MHz
    Max Clocks
        Graphics                    : 1418 MHz
        SM                          : 1418 MHz
        Memory                      : 3505 MHz
        Video                       : 1304 MHz
    SM Clock Samples
        Duration                    : 547.35 sec
        Number of Samples           : 100
        Max                         : 1476 MHz
        Min                         : 1240 MHz
        Avg                         : 1422 MHz
    Memory Clock Samples
        Duration                    : 547.35 sec
        Number of Samples           : 100
        Max                         : 3505 MHz
        Min                         : 3004 MHz
        Avg                         : 3491 MHz
    Clock Policy
        Auto Boost                  : N/A
        Auto Boost Default          : N/A
This output is also useful in that it shows what our current maximum clock speeds can be set to. It’s clear in the output above that our max clock differ from what Applications are permitted to use.
Armed with these values, I can proceed to change my Application Clocks to allow the GPU to clock higher when performing compute workloads. This higher performance state is known as P0 Performance State.
simon@kirika:~$ sudo nvidia-smi -i 0 -ac 3505,1418
Applications clocks set to "(MEM 3505, SM 1418)" for GPU 0000:01:00.0
All done.
Lets run our benchmark again: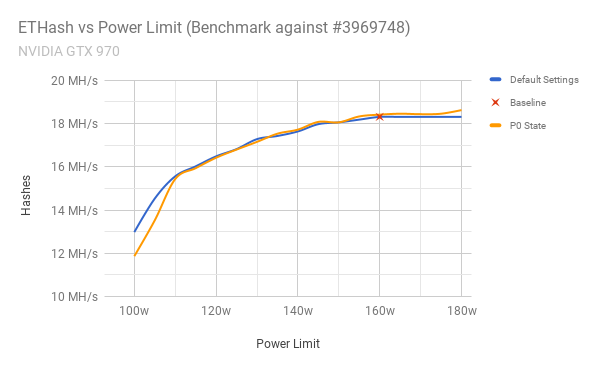 You can just make out that the top-end of our graph is no longer a flatline which suggests we’re now using the full range of clock speeds available on the card. Albeit with little gain… But, I’m sure I can do better!
Overclocking
The final stages of tweaking are whats known as overclocking. The values I’ve chosen here are very much specific to my hardware. You might be able to get a more stable overclock, or have to use lower values – It entirely depends on your own hardware.
In order to achieve this, I’ll be using nvidia-settings which requires a working X server to be able to apply changes to our card. We tell nvidia-settings which X server to attach to with the -c :0 option and in my examples, we’re using display :0
We can also apply changes to multiple GPUs by changing the ID number in the command:
nvidia-settings -c :0 -a [gpu:0]/GPUGraphicsClockOffset[3]=0
nvidia-settings -c :0 -a [gpu:1]/GPUGraphicsClockOffset[3]=0
nvidia-settings -c :0 -a [gpu:2]/GPUGraphicsClockOffset[3]=0
Figuring out how large an overclock your card supports will take a bit of trial, error and a lot of reboots – I started with 100MHz and increased slowly until the card became unstable/crashed. Once you know a stable number, increase it in smaller increments until you start having issues.
My card took a stable overclock at 240MHz. If I go as high as 250MHz, CUDA would sometimes fail to initialize, so make sure you test each value properly.
simon@kirika:~$ nvidia-settings -c :0 -a [gpu:0]/GPUGraphicsClockOffset[3]=240

  Attribute 'GPUGraphicsClockOffset' (kirika:0[gpu:0]) assigned value 240.
For the sake of being thorough, you can also apply an offset to Memory. The comments above still apply here with finding a stable value. In my case, an offset of 1,100MHz was stable, although this actually seemed to result in a frequency change of only 550MHz (which is half of 1,100). In my testing however, a Memory overclock had negligible impact on my results, but your mileage may vary so its still worth giving it a shot…
nvidia-settings -c :0 -a [gpu:0]/GPUMemoryTransferRateOffset[3]=1100
Once you know a good value for both of these, we can now look at adjusting the Application Clocks mentioned earlier to accommodate the new clock speeds for compute workloads.
Check the max values using nvidia-smi -i 0 -q -d clock like before, and set the new clocks accordingly.
simon@kirika:~$ sudo nvidia-smi -ac 4055,1658
Applications clocks set to "(MEM 4055, SM 1658)" for GPU 0000:01:00.0
All done
With my card overclocked and stable, I did another round of benchmarks and you can clearly see the improvement compared to default settings. I mentioned previously that the memory overclock had a negligible impact on my results so I’ve omitted those from the graph.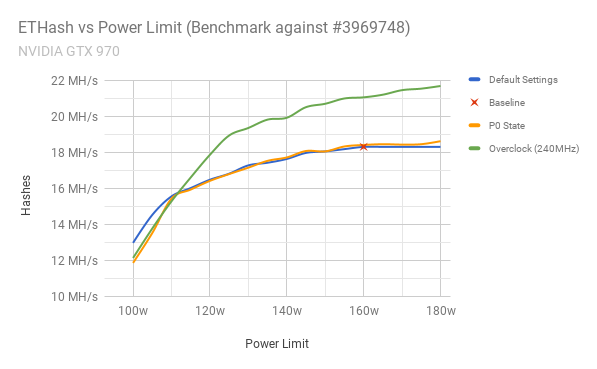
Conclusion
I’ve managed to improve my hash rate by 18.4% – from 18.31MH/s to 21.68MH/s, by overclocking my GPU and increasing the power limit available to the card. Power consumption of the card has increased by approximately 12.5% when at 180 watts (instead of the default 160w), but it’s still worth me running at the higher power threshold.
If however, I wanted to keep power usage at similar (or lower) levels to what we started with, I can limit to 160w and still achieve 21.06MH/s with the overclock, which is still a 15% improvement over default settings! This also has the added advantage of keeping GPU temperatures under control.
For convenience, here are all the changes I’ve made in order to get this improvement (which includes some fan control options to keep on top of cooling):
# Edit X Config to add coolbits
# Reboot
# Make sure X is running

# Enable persistence mode
sudo nvidia-smi -i 0 -pm 1

# Increase our Power Limit from 160 up to 180
sudo nvidia-smi -i 0 -pl 180

# Ensure fan speed is controllable and set it to 55%
# (You can use whatever value you like for fan speed)
nvidia-settings -c :0 \
-a [gpu:0]/GPUFanControlState=1 \
-a [fan:0]/GPUTargetFanSpeed=55 \

# Overclock GPU/RAM
nvidia-settings -c :0 \
-a [gpu:0]/GPUGraphicsClockOffset[3]=240 \
-a [gpu:0]/GPUMemoryTransferRateOffset[3]=1100

# Apply new clocks
sudo nvidia-smi -ac 4055,1658
The nvidia-settings commands could be merged into one, but I kept them separate for clarity.