
Shoehorning Proxmox into mdadm RAID1
My home server has always been somewhat of a Frankenstein’s Monster when it comes to hardware. Until about 2 years ago, it consisted of a large JBOD array of several different drive sizes with no kind of redundancy what-so-ever – for both OS and Data disks. That all changed though when I decided to invest in some 3TB disks and build a “proper” RAID array for my data; Which coincidentally was around the same time my data storage array lost a drive resulting in about 800GB of data-loss – I was unable to source a decent hardware RAID card at the time so I went with Software RAID (mdadm) instead.
The chassis which houses my home server happens to be an old X-Case model that has 10 internal bays, a couple of 5.25″ for Optical drives and a 5.25″ to 3.5″ caddy that seems to be designed for a floppy drive (it has a cut-out at the front for access). I use the floppy slot to house my OS disk and the rest are for my data disks which are all in RAID6 for redundancy. This gives me a total of 11 hard drives in this chassis in its default configuration.
When I rebuilt my server to make use of Proxmox, I put in a known-working drive as the OS drive; It was an old drive at the time but didn’t have much in the way of power on hours so I figured it’d last me a while. Here I am a few years later and the drive is still going, but SMART data is showing some figures that’re making me worried it’s going to start having problems soon so I set about replacing it.
Step 1 – Replace the problem drive
 Sure, I could have just bought a new drive and re-installed my server from scratch, but frankly I couldn’t be bothered with all the niggly applications and configurations I’d need to get right to make it all work nicely again.
Besides, where’s the fun in that?
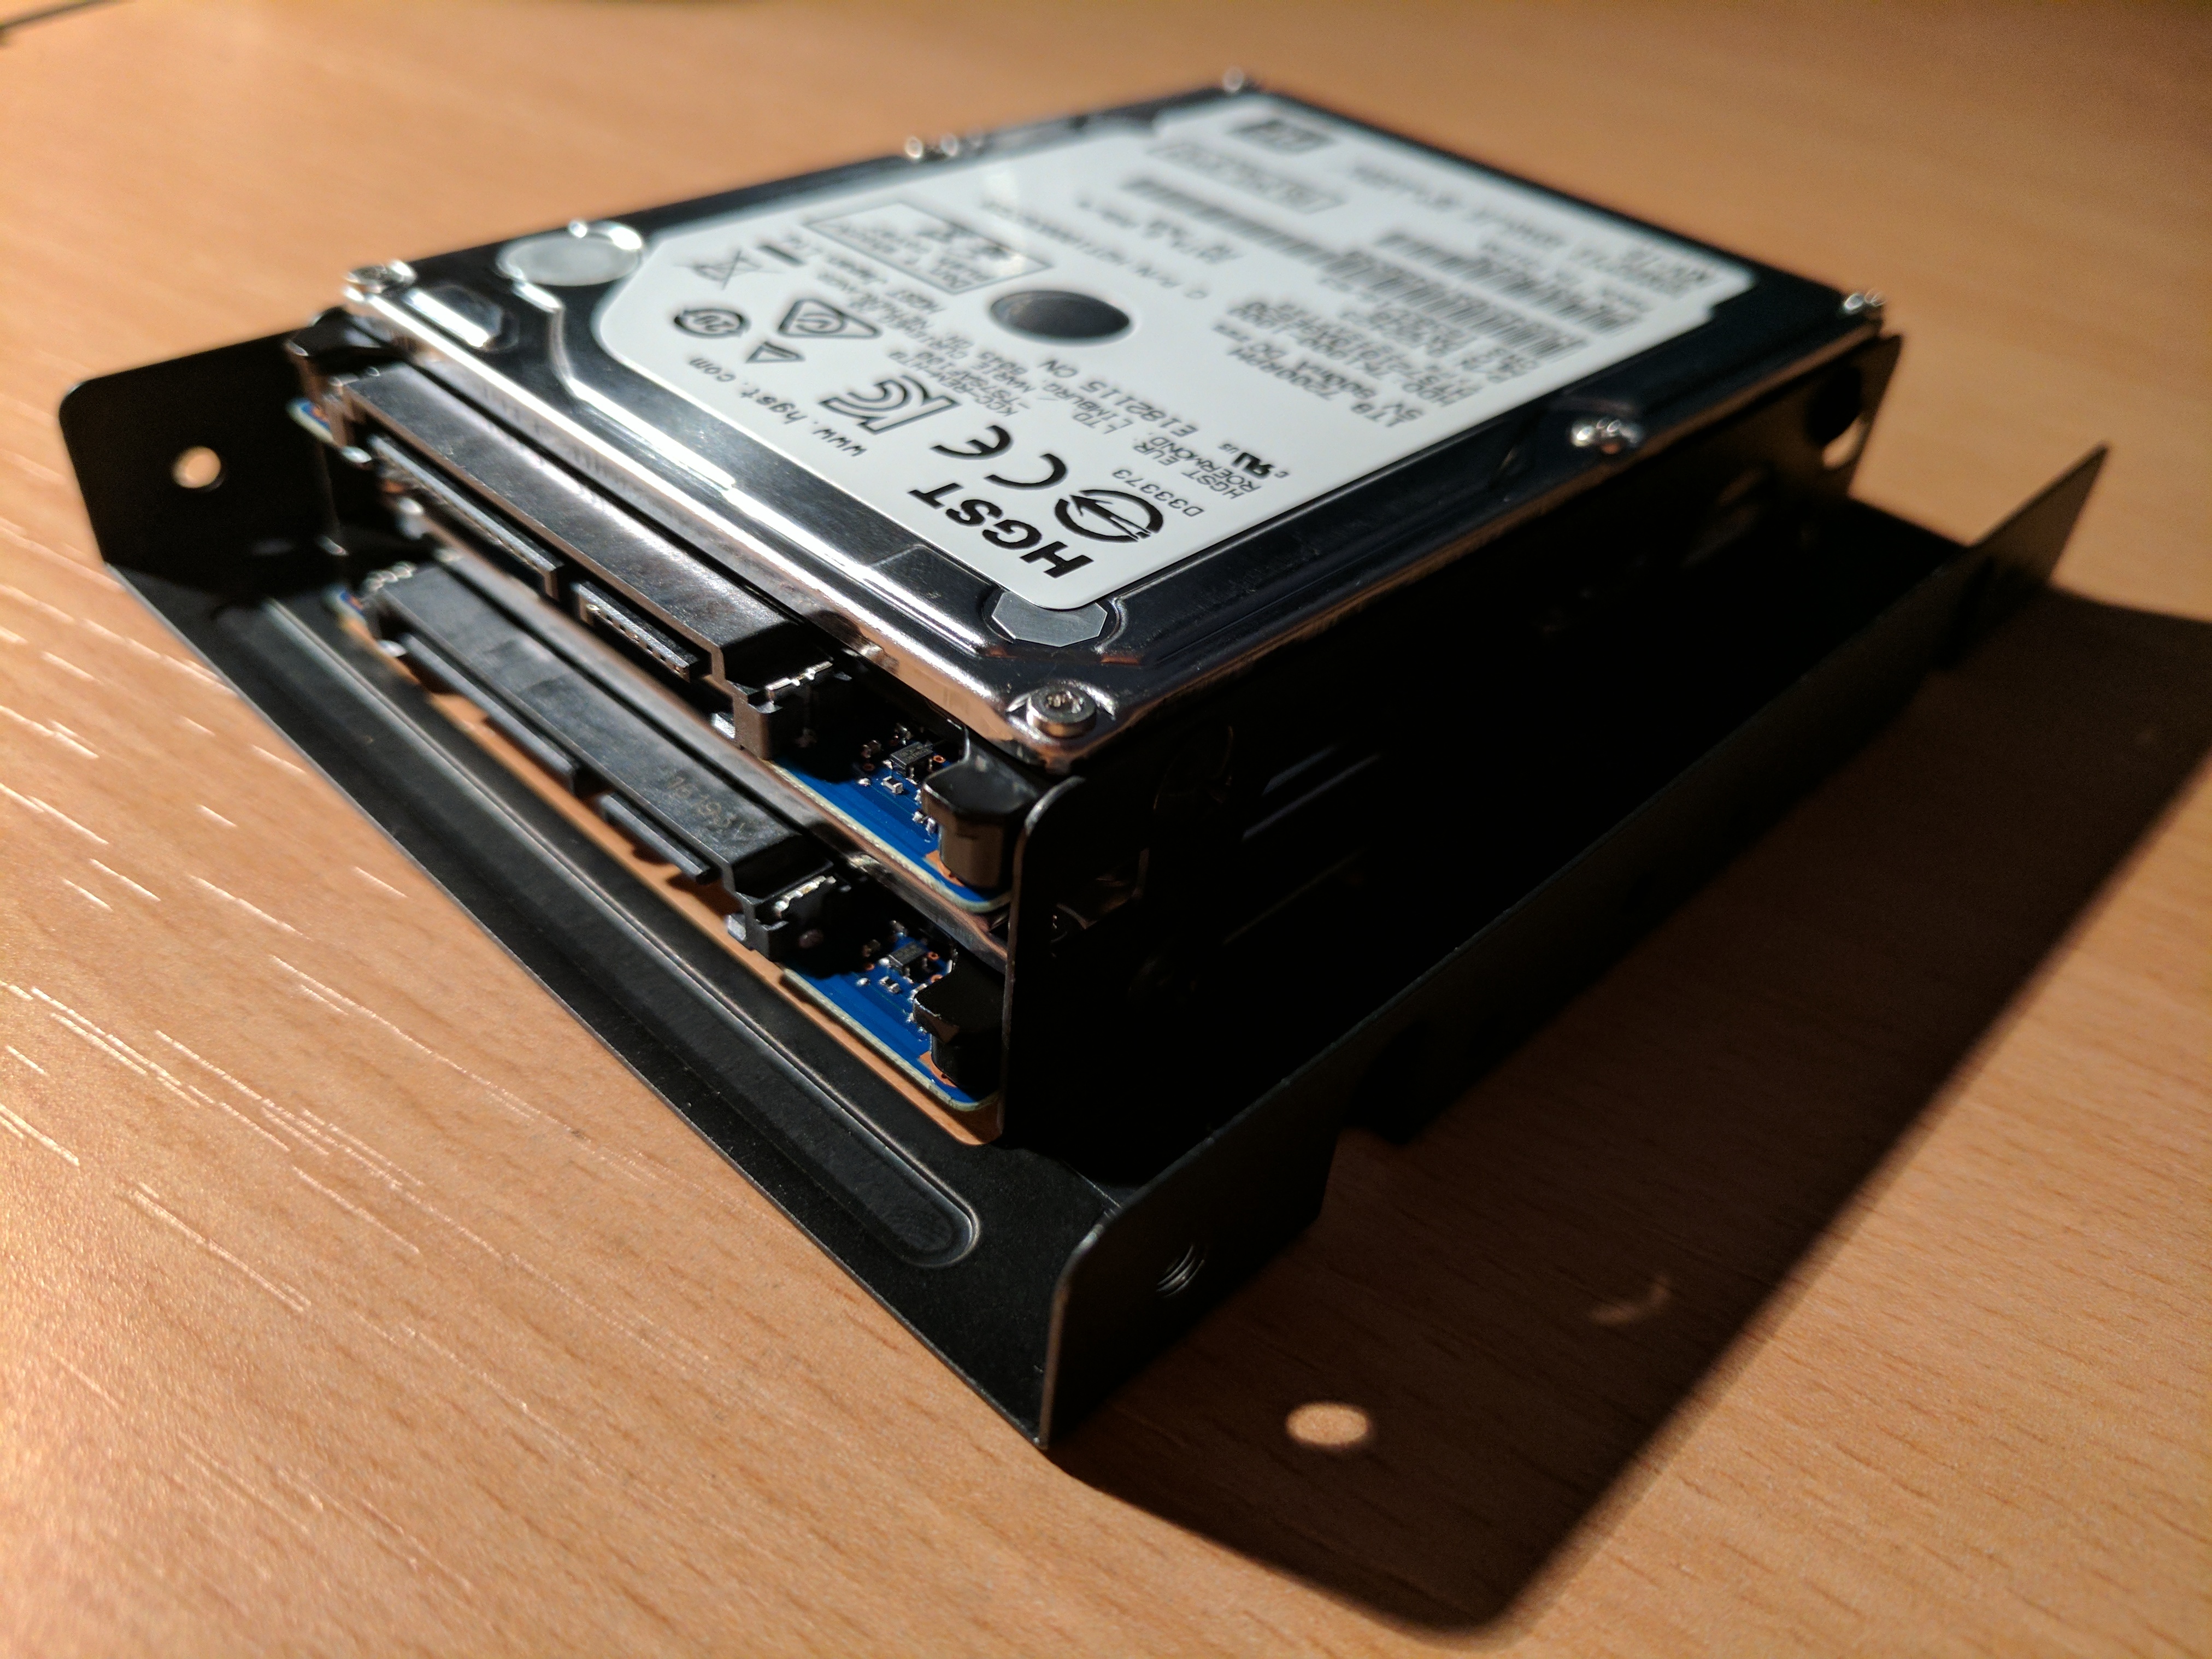
I bought a 3.5″ to Dual 2.5″ adaptor off eBay (In-Win 3RAMZF078700) which, as you might guess, should nicely house a couple of 2.5″ drives where my old 3.5″ OS disk used to live. Having already made use of mdadm on this system, and now having two drives, I should be able to use them in RAID1 for my OS disk.
I chose to get two HGST Travelstar 7K1000 drives because a friend uses a lot of them and has (so far) had no problems with them. They also spin at 7200RPM so should get reasonable performance in RAID1 given I’m limited to essentially a single drive’s performance over more conventional 2.5″ drives which operate at 5400RPM.
There were a couple of things I needed to consider before embarking on this project though – most of which were potential physical constraints inside the chassis itself.
Do I have enough SATA data ports?
My SuperMicro X8DTL-3F motherboard has 6 SATA ports and 8 SAS ports. I learned the hard way that you can only boot from the SATA ports, and that the on-board LSI SAS controller does not support drives larger than 2TB. For my configuration this leaves me with just the 6 on board SATA ports so I invested in an LSI 9211-8i HBA (It’s actually a cross-flashed Dell H200A – http://blog.michael.kuron-germany.de/2014/11/crossflashing-dell-perc-h200-to-lsi-9211-8i/comment-page-1/)
The 9211-8i in theory supports 8 drives – combine the 6 SATA ports on the motherboard with the 8 on the HBA and I have theoretically got 14 ports available to use with my 2 boot drives (RAID1) and 10 data drives (RAID6)
I can only fit 11 disks in the chassis (12 if you count the 2.5″ disks instead) so I should have enough.
Do I have enough SATA power connectors?
My PSU is an EVGA 650 GQ which has 9 native SATA power ports and a further 3 molex connectors to which I can attach some 2xSATA splitters. I use one of the molex connectors for cooling though so I only get 4 SATA connectors from molex and 9 from native. This should be enough for my purposes.
Will the dual 2.5″ bracket even fit where a 3.5″ disk would normally go?
 The HGST Travelstar disks come in at 9.5mm in height. The disk that sits on the bottom of the bracket has enough clearance for a 12mm drive, but the top one was a potential problem as it could sit on the bracket taller than a standard 3.5″ drive.
I’d fitted the 2.5″ drives and stood the bracket next to two different 3.5″ models and as you can see, its about the same height. It is slightly taller than the drive on the right (WD800JD) But is about the same height as the one on the left (WD10EADS)
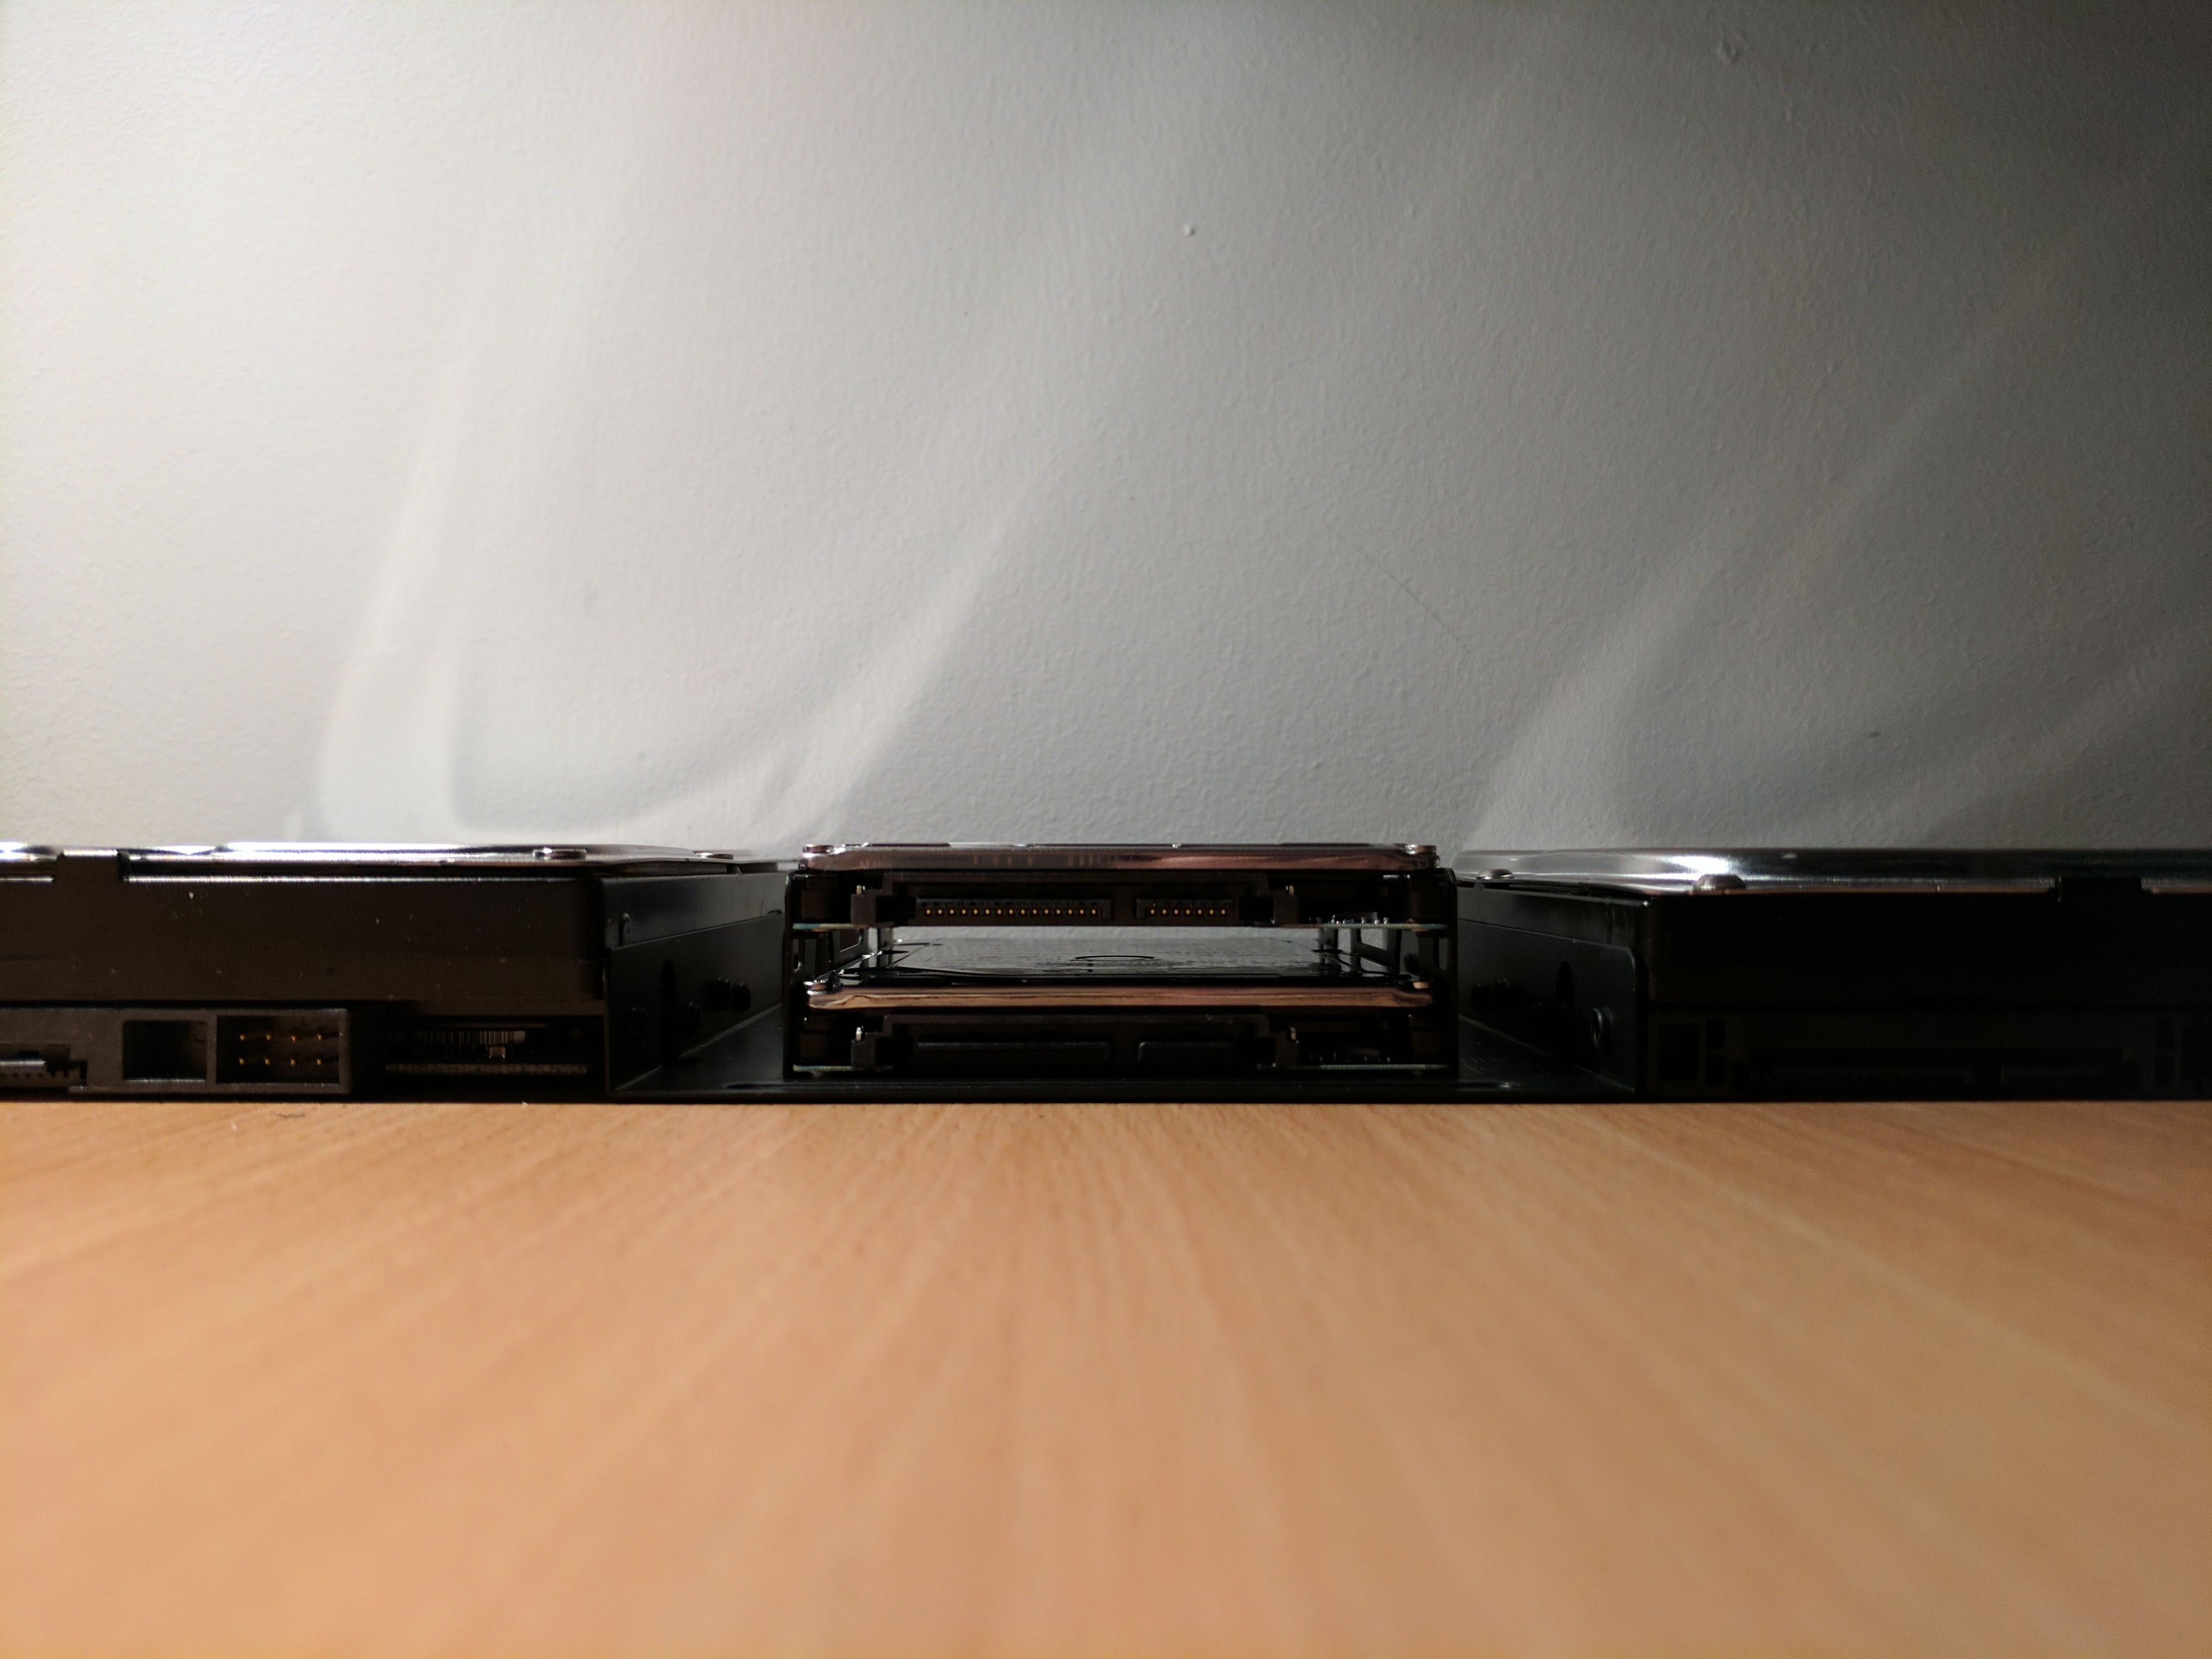
I do have open-air above my drives in this chassis so height restrictions are not a problem for me; However if you wanted to use this bracket in a more conventional 3.5″ bay, you should not have any issues using two 9.5mm drives.
The placement of these drives in the “floppy” bay unfortunately means there is no airflow from case fans so I did have to consider the gap between the drives to allow for cooling – which as you can see should be ample clearance.
Step 2 – Cloning the original
As my plan was to go from a single 3.5″ drive to two 2.5″ drives, that does beg the question as to how I get the data onto the smaller drives. I could have skipped this step and jumped right into Step 4 to assemble the RAID array using both the old and one of the new drives, to later replace the old drive with the remaining new one.
Instead, I opted to use a tool called CloneZilla which will clone the original drive onto the new one (although you could have just used dd) whilst leaving the original untouched should I need to revert (or re-clone) it at a later date. This was a personal choice but I like the idea of having the safety net should anything go wrong further down the line then, at least I could start again if needed.
First we connect one of the new HGST drives up and temporarily plug in the old OS drive so that we can clone it. Next I booted Clonezilla and followed the on-screen instructions clone the drives.
You might need to zero the destination disk first so that everything clones over nicely.
It’s very important that you make sure your destination drive is correct because CloneZilla will overwite anything thats already there
Once the clone is complete, you should be able to disconnect the old drive and boot from the new one. If all goes well then your system should look the same from the OS’s point of view other than the fact you’re now on a larger disk (In my case anyway, I went from 160GB to 1TB).
Step 3 – Fixing the partitions on the larger disk
Before we delve too deep into this, I realize my partitions are not standard for Proxmox these days in that I have a /boot partition outside of the main root partition (for me /dev/sdd2 is /boot). Nonetheless this should not affect the overall process if your partitions are different – you just need to skip the parts that’re specific to me and adjust according to your configuration.
Naturally your mileage may vary depending on how your system is set up. Don’t just blindly paste commands into a terminal as you could cause irreversible data-loss 🙂 – Make sure you understand what you’re doing!
Now that we’ve a cloned the old OS disk onto one of the new (larger) disks, I thought now would be a good time to fix the primary data partition (where the “pve” LV lives) so that it takes up the entirety of the disk. I went from a 160GB to 1TB drive so to do this I simply loaded parted and took a look at the partitions whilst telling it to display sector count instead of the default – It showed me a warning about the GPT size being wrong and offered to correct it for me.
root@yuzuki:~# parted /dev/sdd
GNU Parted 3.2
Using /dev/sdd
Welcome to GNU Parted! Type 'help' to view a list of commands.
(parted) unit s
(parted) print free
Warning: Not all of the space available to /dev/sdd appears to be used, you can fix the GPT
to use all of the space (an extra 1640943360 blocks) or continue with the current setting?
Fix/Ignore? Fix
Model: ATA HGST HTS721010A9 (scsi)
Disk /dev/sdd: 1953525168s
Sector size (logical/physical): 512B/4096B
Partition Table: gpt
Disk Flags:

Number  Start       End          Size         File system  Name     Flags
        34s         2047s        2014s        Free Space
 1      2048s       4095s        2048s                     primary  bios_grub
 2      4096s       1048575s     1044480s     ext3         primary  boot, esp
 3      1048576s    312580095s   311531520s                primary  lvm
        312580096s  1953525134s  1640945039s  Free Space
Here we can see the current starting sector for our last partition (partition 3, aka /dev/sdd3) is 1048576 and the last usable sector of free space is 1953525134. We should simply be able to remove the partition table (It wont remove data) and then re-create it with a larger size. As long as the starting position is the same then everything should line-up.
(parted) rm 3
Error: Partition(s) 3 on /dev/sdd have been written, but we have been unable to inform the
kernel of the change, probably because it/they are in use.  As a result, the old partition(s)
will remain in use.  You should reboot now before making
further changes.
Ignore/Cancel? i
(parted) mkpart primary 1048576 1953525134
(parted) toggle 3 lvm
(parted) print
Model: ATA HGST HTS721010A9 (scsi)
Disk /dev/sdd: 1953525168s
Sector size (logical/physical): 512B/4096B
Partition Table: gpt
Disk Flags:

Number  Start     End          Size         File system  Name     Flags
 1      2048s     4095s        2048s                     primary  bios_grub
 2      4096s     1048575s     1044480s     ext3         primary  boot, esp
 3      1048576s  1953525134s  1952476559s               primary  lvm

(parted) quit
Information: You may need to update /etc/fstab.
Finally we need to make sure that LVM is aware of the new disk size lest we forget about it later on
root@yuzuki:~# pvdisplay /dev/sdd3
  --- Physical volume ---
  PV Name               /dev/sdd3
  VG Name               pve
  PV Size               148.55 GiB / not usable 3.00 MiB
  Allocatable           yes
  PE Size               4.00 MiB
  Total PE              38028
  Free PE               4095
  Allocated PE          33933
  PV UUID               6p74nl-SxZp-4xu7-j3lH-ACsg-Hs9I-5rNwpq

root@yuzuki:~# pvresize /dev/sdd3
  Physical volume "/dev/sdd3" changed
  1 physical volume(s) resized / 0 physical volume(s) not resized

root@yuzuki:~# pvdisplay /dev/sdd3
  --- Physical volume ---
  PV Name               /dev/sdd3
  VG Name               pve
  PV Size               931.01 GiB / not usable 312.50 KiB
  Allocatable           yes
  PE Size               4.00 MiB
  Total PE              238339
  Free PE               204406
  Allocated PE          33933
  PV UUID               6p74nl-SxZp-4xu7-j3lH-ACsg-Hs9I-5rNwpq
If you didn’t want to implement RAID1 then this is where you’d stop – We’ve moved our OS to a new disk without reinstalling.
I however do want to implement RAID1 so in Step 4 I’ll walk through how to prepare the second RAID member and begin the process of moving towards having a complete array.
Step 4 – Preparing for RAID
The purpose of this article is to document how I implemented software RAID1 on a live system without having to reinstall. In the previous steps, I took a little detour in that I cloned the original disk onto one of the new replacement disks. Primarily this was to preserve the original data should anything not go according to plan. The following steps are where you’d start if you wanted to skip the cloning process and work on the source disk without a “spare” copy of your data.
It’s important that you identify which companion disk you intend to use for your array. A useful tool to use here would be smartctl. With this tool you can query each disk until you find which ones you want to work with (Especially useful if you have a lot of disks).
root@yuzuki:~# smartctl -i /dev/sdd
smartctl 6.6 2016-05-31 r4324 [x86_64-linux-4.4.35-2-pve] (local build)
Copyright (C) 2002-16, Bruce Allen, Christian Franke, www.smartmontools.org

=== START OF INFORMATION SECTION ===
Model Family:     HGST Travelstar 7K1000
Device Model:     HGST HTS721010A9E630
Serial Number:    JR1000********
LU WWN Device Id: 5 000cca 8c8d62953
Firmware Version: JB0OA3U0
User Capacity:    1,000,204,886,016 bytes [1.00 TB]
Sector Sizes:     512 bytes logical, 4096 bytes physical
Rotation Rate:    7200 rpm
Form Factor:      2.5 inches
Device is:        In smartctl database [for details use: -P show]
ATA Version is:   ATA8-ACS T13/1699-D revision 6
SATA Version is:  SATA 3.0, 6.0 Gb/s (current: 3.0 Gb/s)
Local Time is:    Mon Mar  6 21:16:45 2017 GMT
SMART support is: Available - device has SMART capability.
SMART support is: Enabled
In my case, /dev/sdd is the non-RAID disk which currently houses my OS and /dev/sde is the blank disk I want to initialize my array onto. Firstly we need to copy the current partition table from /dev/sdd to /dev/sde. As the partition table is GPT, we should use sgdisk to do this.
root@yuzuki:~# sgdisk -R=/dev/sde /dev/sdd
The operation has completed successfully.
Once this command has completed, we should now change the type code for /dev/sde2 and /dev/sde3 to reflect that these partitions are members of software RAID. You can do this with any partition tool that supports GPT, but in my case I’ll use sgdisk to change the types.
root@yuzuki:~# sgdisk -t 2:fd00 /dev/sde
The operation has completed successfully.

root@yuzuki:~# sgdisk -t 3:fd00 /dev/sde
The operation has completed successfully.
This should nicely result in /dev/sde having the same partition structure as /dev/sdd (but with both partition types as Linux RAID)
root@yuzuki:~# fdisk -l /dev/sde

Disk /dev/sde: 931.5 GiB, 1000204886016 bytes, 1953525168 sectors
Units: sectors of 1 * 512 = 512 bytes
Sector size (logical/physical): 512 bytes / 4096 bytes
I/O size (minimum/optimal): 4096 bytes / 4096 bytes
Disklabel type: gpt
Disk identifier: A4EF094E-5546-4DC1-A262-2B08B9C586B1

Device       Start        End    Sectors  Size Type
/dev/sde1     2048       4095       2048    1M BIOS boot
/dev/sde2     4096    1048575    1044480  510M Linux RAID
/dev/sde3  1048576 1953525134 1952476559  931G Linux RAID
Step 5 – Initialize RAID
We’re now at the stage where both our disks should be nearly identically partitioned and we can actually start creating our arrays. We’ll first do this in a degraded state which will allow us to move data around.
In my case /dev/sdd2 is /boot and /dev/sdd3 houses my LVM data (ultimately containing / and swap).
I already have /dev/md0 as my primary data storage RAID, so /dev/md1 will be for /boot and /dev/md2 for everything else.
Lets start by creating both mdadm devices, but using the currently empty disk (/dev/sde) – I chose to ignore the notice displayed as my version of grub has support for mdadm out of the box.
root@yuzuki:~# mdadm --create /dev/md1 --level=1 --raid-disks=2 missing /dev/sde2
mdadm: Note: this array has metadata at the start and
    may not be suitable as a boot device.  If you plan to
    store '/boot' on this device please ensure that
    your boot-loader understands md/v1.x metadata, or use
    --metadata=0.90
Continue creating array? y
mdadm: Defaulting to version 1.2 metadata
mdadm: array /dev/md1 started.

root@yuzuki:~# mdadm --create /dev/md2 --level=1 --raid-disks=2 missing /dev/sde3
mdadm: Note: this array has metadata at the start and
    may not be suitable as a boot device.  If you plan to
    store '/boot' on this device please ensure that
    your boot-loader understands md/v1.x metadata, or use
    --metadata=0.90
Continue creating array? y
mdadm: Defaulting to version 1.2 metadata
mdadm: array /dev/md2 started.
Next we need to ensure that the new arrays are started at boot. Typically this is done by adding them to mdadm.conf. The location of this file may vary depending on your OS but on debian its in /etc/mdadm. I simply take a look at the 2 arrays and add them to the end of the config file
root@yuzuki:~# mdadm --detail --scan /dev/md{1,2} >> /etc/mdadm/mdadm.conf
We should now be in a position where you have /dev/md1 and /dev/md2 and they should both start automatically on-boot. Next we’ll look at making use of them!
Step 6 – Configure grub and move /boot
We should now have our degraded arrays which we can now immediately start to use. I’ll begin by creating a new file system on /dev/md1 for use with /boot and then move data to it. Obviously if your /boot is not a separate partition but is included in your root partition then you don’t need to worry about this part.
root@yuzuki:~# mkfs.ext4 /dev/md1
mke2fs 1.42.12 (29-Aug-2014)
Creating filesystem with 521920 1k blocks and 130560 inodes
Filesystem UUID: 37e651bc-ffc1-41d8-a9c7-99ca9273b829
Superblock backups stored on blocks:
        8193, 24577, 40961, 57345, 73729, 204801, 221185, 401409

Allocating group tables: done
Writing inode tables: done
Creating journal (8192 blocks): done
Writing superblocks and filesystem accounting information: done

root@yuzuki:~# mkdir /mnt/tmp
root@yuzuki:~# mount /dev/md1 /mnt/tmp/
root@yuzuki:~# cp -ax /boot/* /mnt/tmp/
root@yuzuki:~# umount /mnt/tmp
root@yuzuki:~# rmdir /mnt/tmp
Once all this is done, lets edit /etc/fstab to tell our system to mount /boot from the new array. Your fstab will be different to mine, but find where /boot is mounted and change it to /dev/md1 (I kept my original UUID around just in-case)
root@yuzuki:~# cat /etc/fstab
# <file system> <mount point> <type> <options> <dump> <pass>
#UUID=f6f3e14e-a2fe-468f-80ee-8824dab51e36 /boot ext3 defaults 0 1

/dev/md1 /boot ext4 defaults 0 1
/dev/pve/root / ext4 errors=remount-ro 0 1
/dev/data/wdred /mnt/storage ext4 defaults,barrier=0 0 1
/dev/pve/swap none swap sw 0 0
proc /proc proc defaults 0 0
It’s critical you make sure there are no errors here, getting this wrong could result in an un-bootable system!
At this point I chose to reboot my system to ensure it’s booting correctly and running /boot from the correct place
root@yuzuki:~# mount | grep boot
/dev/md1 on /boot type ext4 (rw,relatime,stripe=4,data=ordered)
mdadm needs to be told to start all arrays on-boot (As we intend to host / in an array) so edit /etc/default/mdadm and change INITRDSTART to ‘all’ (Mine was set to ‘none’ by default)
root@yuzuki:~# grep ^INITRDSTART /etc/default/mdadm
INITRDSTART='all'
Followed by some grub and initrd changes
root@yuzuki:~# echo 'GRUB_DISABLE_LINUX_UUID=true' >> /etc/default/grub
root@yuzuki:~# echo raid1 >> /etc/modules
root@yuzuki:~# echo raid1 >> /etc/initramfs-tools/modules
And then make sure grub (boot loader) exists on the 2 new RAID disks followed by a grub update and RAM disk update
root@yuzuki:~# grub-install /dev/sdd
Installing for i386-pc platform.
Installation finished. No error reported.
root@yuzuki:~# grub-install /dev/sde
Installing for i386-pc platform.
Installation finished. No error reported.

root@yuzuki:~# update-grub
Generating grub configuration file ...
Found linux image: /boot/vmlinuz-4.4.35-2-pve
Found initrd image: /boot/initrd.img-4.4.35-2-pve
Found memtest86+ image: /memtest86+.bin
Found memtest86+ multiboot image: /memtest86+_multiboot.bin
done

root@yuzuki:~# update-initramfs -u
update-initramfs: Generating /boot/initrd.img-4.4.35-2-pve
Now we’re in the final stretch!
Step 7 – Assembling the arrays
If everything has gone to plan, our system should now be running /boot from /dev/md1 which means the old /boot partition on /dev/sdd2 is no longer needed. We should set its type to Linux RAID and add it to our array
root@yuzuki:~# sgdisk -t 2:fd00 /dev/sdd
Warning: The kernel is still using the old partition table.
The new table will be used at the next reboot.
The operation has completed successfully.

root@yuzuki:~# mdadm --add /dev/md1 /dev/sdd2
mdadm: added /dev/sdd2

root@yuzuki:~# cat /proc/mdstat
Personalities : [raid6] [raid5] [raid4] [raid1]
md2 : active raid1 sde3[1]
      976107200 blocks super 1.2 [2/1] [_U]
      bitmap: 1/8 pages [4KB], 65536KB chunk

md1 : active raid1 sdd2[2] sde2[1]
      521920 blocks super 1.2 [2/1] [_U]
      [===========>.........]  recovery = 55.2% (288896/521920) finish=0.0min speed=144448K/sec

md0 : active raid6 sdh1[0] sdc1[6] sda1[7] sdg1[5] sdf1[4] sdi1[2] sdb1[1]
      14650670080 blocks super 1.2 level 6, 512k chunk, algorithm 2 [7/7] [UUUUUUU]

unused devices: <none>
And viola, we now have (when its recovered) a working software RAID for /boot
Next we’ll add /dev/md2 to LVM and make the space available to our pve volume group so that we can simply pvmove the remaining data to our RAID array.
root@yuzuki:~# pvcreate /dev/md2
  Physical volume "/dev/md2" successfully created
root@yuzuki:~# pvdisplay
  --- Physical volume ---
  PV Name               /dev/sdd3
  VG Name               pve
  PV Size               931.01 GiB / not usable 312.50 KiB
  Allocatable           yes
  PE Size               4.00 MiB
  Total PE              238339
  Free PE               204406
  Allocated PE          33933
  PV UUID               6p74nl-SxZp-4xu7-j3lH-ACsg-Hs9I-5rNwpq

  "/dev/md2" is a new physical volume of "930.89 GiB"
  --- NEW Physical volume ---
  PV Name               /dev/md2
  VG Name
  PV Size               930.89 GiB
  Allocatable           NO
  PE Size               0
  Total PE              0
  Free PE               0
  Allocated PE          0
  PV UUID               PzVPqV-Rn1V-ASA5-Q4Ni-cXhS-LUCu-QZUTiC


root@yuzuki:~# vgextend pve /dev/md2
  Volume group "pve" successfully extended
You might notice that /dev/sdd3 and /dev/md2 aren’t the same size according to LVM – I suspect this is because of RAID metadata overheads. Thankfully because I am moving from smaller to larger disks, I have enough Free PE that I can move without issue. If however you have no Free PE’s and your disks are not equal in size like shown above, you might need to shrink one of your Logical Volumes and fix the file system later.
I’m happy that I can proceed here so I move the contents of /dev/sdd3 to /dev/md2 within LVM
root@yuzuki:~# pvmove /dev/sdd3 /dev/md2
  /dev/sdd3: Moved: 100.0%
The pvmove itself will take a while depending on how much data there is to move (Allocated PE) but once that is done, all we have left to do is remove the old disk from LVM
root@yuzuki:~# vgreduce pve /dev/sdd3
  Removed "/dev/sdd3" from volume group "pve"

root@yuzuki:~# pvremove /dev/sdd3
  Labels on physical volume "/dev/sdd3" successfully wiped
And then to add the old partition to our corresponding mdadm array
root@yuzuki:~# mdadm --add /dev/md2 /dev/sdd3
mdadm: added /dev/sdd3

root@yuzuki:~# cat /proc/mdstat
Personalities : [raid1] [raid6] [raid5] [raid4]
md2 : active raid1 sdd3[2] sde3[1]
      976107200 blocks super 1.2 [2/1] [_U]
      [>....................]  recovery =  1.3% (12725760/976107200) finish=133.5min speed=120174K/sec
      bitmap: 2/8 pages [8KB], 65536KB chunk

md1 : active raid1 sdd2[2] sde2[1]
      521920 blocks super 1.2 [2/2] [UU]

md0 : active raid6 sdh1[0] sdb1[6] sda1[7] sdg1[5] sdf1[4] sdi1[2] sdc1[1]
      14650670080 blocks super 1.2 level 6, 512k chunk, algorithm 2 [7/7] [UUUUUUU]

unused devices: <none>
A final reboot to make sure everything comes up correctly and if so, its just a matter of waiting for RAID recovery to complete.